Friday, 23 November 2012

Review Bundle Monster Set 3

Opening my Bundle Monster plates (click here for the original post):
Close up of Bundle Monster Plates (click here for the original post):

Testing Bundle Monster Plate Set 3:

I'm not going to post the video because for some reason my Window's Movie Maker refuses to convert the file in proper format.

For stamping polish I used:
- Konad's special dark orange stamping polish (for image plates BM-301 to BM-308),
- Cherry Red from SallyHansen's Xtreme wear collection (for image plates BM-309 to BM-314),
- Green With Envy from SallyHansen's Xtreme wear collection (for only 1 image on BM-315, the detail was visible in person but my camera wasn't picking it up so I changed my color),
- Blue Me Away from SallyHansen's Xtreme Wear collection (for image plates BM-315 to BM-

NOTE: If an image gave me a problem I'll mention that underneath the image.
BM-301

BM-302

BM-303
I did have some issues with this plate but I'm guessing it's possible that the lip has some adhesive on it(I did try taking it off but it wasn't coming off) maybe that's why I had a hard time stamping it properly (even when I tried using a metal scraper). Also, the butterfly's antenna gave me some problems but after I turned my fan off it worked fine for me. 
BM-304

BM-305
This plate gave me the hardest time out of the entire set. I found it helped when I used a metal scraper instead of the plastic scraper (especially for the lighting, for the devils tail, for the devil's face and for the small devil). Also for some of the images I did have to try scraping in different directions.
BM-306

BM-307

BM-308
The first time I stamped the citrus I sneezed so it didn't turn out that great. Also I stamped the image with various kitchen supplies on them twice because my stamper wasn't picking up the entire image.
BM-309
For this I didn't really have a hard time but I recommend turning your fan/AC off if you want the sandals to stamp properly.
BM-310
My stamper didn't pick up the entire image.
BM-311
The small love in the image that has a heart and the word love written in large and bold letters gave me a bit of problem (it's not engraved deep enough). 
BM-312
The bear on this plate doesn't really like me!!! No matter what I did the outline of the bear's face refused to stamp.
BM-313

BM-314
I only had some problems with once image on this plate (heart with wings) but after I used a metal scraper it worked fine.
BM-315
I started with a different nail polish for stamping but my camera didn't pick up the colour so I went back to the blue stamping polish that I was using.
BM-316
Honestly I was really tired when stamping this plate that's why I kept missing parts of the images when I was trying to pick it up.

I had only made a video on BM-317 to BM-325 and since the video is not working I don't have pictures for those plates.

Overall I really love the stamping plates; the images are original and the finest detail is visible in the final . I'm not going to be biased against the entire set just because some of my images didn't work especially since I know Bundle Monster has improved there sets a lot since the very 1st set they released few years ago.
- You can purchase Bundle Monster plates directly from bundle monster (by clicking here) or through amazon (by clicking here).
- I've bought most of my Konad stamping polish from ocnailart (click here) or either from wowsocool (click here)
- SallyHansen's Xtreme Wear nail polishes can be purchased from most stores like Walmart, Loblaws, Superstore, Shoppers Drug Mart, etc.

NOTE: Everything mentioned in this post was purchased using my own money. Everything I said in this post is my honest opinion. Also I wasn't paid or asked by any of these companies to review/mention there products in my post!

Hope you enjoyed my post for today. If you liked it or hated it let me know in the comment or reaction section below.

Friday, 6 July 2012

Cute Nail Stamping

For today's post I was planning on posting my review for bundle monster's new stamping plates but I wasn't fully done (I edited the entire video into 1 and it ended up being too long so I'm planning on dividing it and editing it again; hopefully it'll be up by Sunday <= keep in mind it has 25 plates). Well for today's post I decided to upload an old manicure. Actually I made the tutorial in February but never had the time to edit it so I decided to edited it and post that instead of my bundle monster's review.

Tutorial:
NOTE: For the original manicure I didn't use Konad plates. Back when I got into nail art I didn't know the difference between Konad/fake/bundle monster (or any other nail plates) stamping plates but I loved how girls were able to make pretty prints on there nails using stamping plates. After a while I decided to invest in some stamping plates and bought some fake plates from ebay (they came in a bundle of 8 and or 15 for a very low price). I wanted to upload the tutorial again using the original plates but than I remembered how Konad has become strict on fake plates so I decided to post this instead.

The image plates that I used originally:
Apart from a base and top coat I only applied the red nail polish on the french tip (sorry I don't remember the red nail polish I used) and for stamping I used Timeless White by Sallyhansen. Final manicure:

Hope you enjoyed my post for today. If you liked it or hated it let me know in the comment or reaction section below.

Tuesday, 3 July 2012

Henna Print Nails Using BM-315 With a Matte Finish

I did this manicure on Saturday but never got around to posting it <= I've been busy with some personal issues in my life and also I've been studying for an entrance exam for something (and it requires me to know everything that I've studied for the past 5-6 years)=> in other words I might only do a post once a week or once every other week.

For this manicure I used I Brake For Manicures by OPI as my base color. I Brake For Manicures is a dusty purple. In this picture I only applied 2 thin coats. Swatch of I Brake For Manicures:
Swatch with flash:
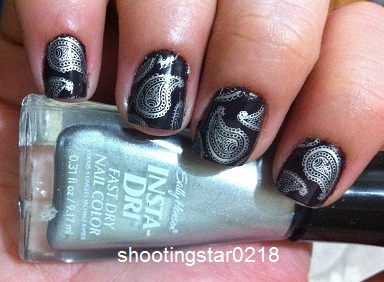
For stamping I used Silver Sweep by SallyHansen's Insta-Dry collection with bundle monster's image plate BM-315 (set 3 series that were released few weeks ago; click here if you want more information on the 3rd set). How it looked after I stamped:

After stamping I decided to use a matte top coat (matte about you by essie) instead of shinny one. Helpful hint when you apply a matte about you avoid going over the same spot twice and try to have a fuller brush otherwise it will streak the stamp on your nails. Honestly I couldn't decide on which image to post so I decided to post 4 images of the final design instead of 1 -2.


Hope you enjoyed my post for today. If you liked it or hated it let me know in the comment or reaction section below.

Toe Nail Stamping

I usually just paint my toe nails and stop there but after getting my bundle monster set 3 I decided to go another step and stamp on them :D. I must admit I loved how it turned out.

For this manicure I used Color To Dine For by OPI as my base colour; and for stamping I used Silver Sweep by SallyHansen's Insta-Dry collection with bundle monster's image plate BM-310 (set 3 series that were released few weeks ago; If you want more information on this click here). How it looked after I stamped and applied a layer of top coat:
Close-up:
Hope you enjoyed my post for today. If you liked it or hated it let me know in the comment or reaction section below.

Friday, 29 June 2012

Close up of Bundle Monster Images Part 2 of 3

I think the title summed up the post pretty well.
If you want to see part 1 ( Removing the plastic from the plates that appear damaged click here), part 3 (testing the plates; click here to see the post)

Video for the close up images:

I'm sorry I haven't had time to take images of the plates individually but if you want to see the images posted by bundle monster then click here.

You can purchase them directly from bundle monster (by clicking here) or through amazon (by clicking here). They are for $21.99 plus shipping of $4 (if you live in USA normal shipping is $0) or $10 or $25(if you want it within 2-3 days). NOTE: I paid $4 for shipping and got them after 5 business days.

Hope you enjoyed my post for today. If you liked it or hated it let me know in the comment or reaction section below.

Opening my Bundle Monster Set 3 Plates (Part 1 of 3)


I’m going to divide my bundle monster review into 3 parts (considering the fact that not everyone wants to see every part and/or detail):
Part 1  Removing the plastic from the plates (BM set 3) that appear as if they might be damaged or defective.
Part 2  Bundle Monster Set 3 (Images; click here to see the original post)
Part 3  Testing the plate (click here to see part 3)

Part 1:
I finally got my bundle monster plates yesterday:D. It took exactly 7 days (or 5 business days to be more exact) for me to get them. You can purchase them directly from bundle monster (by clicking here) or through amazon (by clicking here). They are for $21.99 plus shipping of $4 (if you live in USA normal shipping is $0) or $10 or $25(if you want it within 2-3 days). NOTE: I paid $4 for shipping.

I wasn't really going to video myself opening my stamping plates but after reading various comments (mainly on scratched plates) I was a bit scared so I decided to video tape it for my own safety. After I opened them I started counting them and during the process I noticed some of the plates were scratched; I'm not going to lie but I did start freaking out a bit at that time. After I removed the plastic from them I was relived that the images on my plates weren't defective instead only the plastic on them was damaged. At that time I remembered all the comments I had seen and decided to post this video. One of the only reason why I'm posting this video is because I know I'm not the only one who this happened to and to mainly prevent people from panicking. If you do get plates that have scratches on them then either take before and after images or video tape it (while removing the plastic from them). Also I'm not saying that just because the scratches on the plastic didn't affect the image of my plates they wouldn't affect yours either I'm only trying to prevent people from freaking out like I did.

Hope you enjoyed my post for today. If you liked it or hated it let me know in the comment or reaction section below.

Friday, 22 June 2012

Simple Stamping Using RA-106

For today's post I used Dim Sum Plum by OPI as my base color. Dim Sum Plum is a magenta pink/purple color (and no the color doesn't look like a plum) and the formula is really good (honestly if you layer it properly you can get away with 1 coat but I did 2 coats to be on the safe side). Swatches of Dim Sum Plum:

For stamping I used Lickety-Split Lime by SallyHansen's Insta-Dry collection with red angel's image plate RA-106. I liked how the stamp came out using Lickety-Split Lime but I was hoping it would be a bit brighter then this. Swatches of the final look:

Hope you enjoyed my post for today. If you liked it or hated it let me know in the comment or reaction section below.
Related Posts Plugin for WordPress, Blogger...