I did this manicure on Saturday but never got around to posting it <= I've been busy with some personal issues in my life and also I've been studying for an entrance exam for something (and it requires me to know everything that I've studied for the past 5-6 years)=> in other words I might only do a post once a week or once every other week.
For this manicure I used I Brake For Manicures by OPI as my base color. I Brake For Manicures is a dusty purple. In this picture I only applied 2 thin coats. Swatch of I Brake For Manicures:
Swatch with flash:
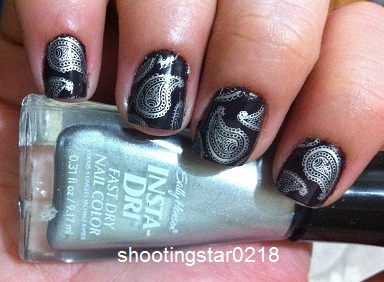
For stamping I used Silver Sweep by SallyHansen's Insta-Dry collection with bundle monster's image plate BM-315 (set 3 series that were released few weeks ago; click here if you want more information on the 3rd set). How it looked after I stamped:
After stamping I decided to use a matte top coat (matte about you by essie) instead of shinny one. Helpful hint when you apply a matte about you avoid going over the same spot twice and try to have a fuller brush otherwise it will streak the stamp on your nails. Honestly I couldn't decide on which image to post so I decided to post 4 images of the final design instead of 1 -2.
Hope you enjoyed my post for today. If you liked it or hated it let me know in the comment or reaction section below.
For today's post I used Dim Sum Plum by OPI as my base color. Dim Sum Plum is a magenta pink/purple color (and no the color doesn't look like a plum) and the formula is really good (honestly if you layer it properly you can get away with 1 coat but I did 2 coats to be on the safe side). Swatches of Dim Sum Plum:
For stamping I used Lickety-Split Lime by SallyHansen's Insta-Dry collection with red angel's image plate RA-106. I liked how the stamp came out using Lickety-Split Lime but I was hoping it would be a bit brighter then this. Swatches of the final look:
Hope you enjoyed my post for today. If you liked it or hated it let me know in the comment or reaction section below.
For today's post I'll be posting only swatches :(. One of them is new while the other two are old. Actually I was going to stop updating my blog until April 27 but then I didn't feel right just ending my blog for a week without giving any notice/reason to be readers. The reason is I'm currently having my finals so for me to even do my nails is really in-vain (even though it reduces my stress level) because I usually end up ruining my manicure without realizing it (I'll post a picture at the end explaining what I mean :P).
For the first set of swatches I want to start with Catherine Arley # 676, it's a silver holographic nail polish. It's a Bulgarian brand of polish, and can be bought from beautycosmetic.biz; I bought mine from ebay (heard some people had terrible experience with the website). Anyways, the application is smooth (I did need to apply 3-4 coats because I found the formula to be a bit thinner than what I'm used to) and to top it off you don't really need a top coat to finish the look because it dries really fast and has a smooth finish to it; in my opinion it's better than #61 from Nfu-Oh and unlike Nfu-Oh you don't need to buy a special base coat to apply it (or if you are using a normal base coat use 2-3 coats before applying Nfu-Oh). I think I might swatch this again after my exams are done because the swatches didn't turn out that great. Anyways, enough chip chapping, time to see the swatches:
lol I can't really say swatches in sun light because the sun was setting when I took the pictures so they didn't turn out that great. So, swatches in partial Sunlight:
Moving on to the next color. For this manicure I used Splash of Grenadine by Essie, it's a pinky purplish color (actually it's somewhere in between the two shades). The formula is smooth and you can get away with just two coats, but to be on the safe side I used three. Actually if I had an option of wearing only two colors for rest of my life than I'd chose Splash of Grenadine and Papaya Punch (by China Glaze). Swatches of Splash of Grenadine:
I decided to layer Cream Pearl by Kleancolor (a clear glitter polish with really small glitters of purple, blue, green, orange and pink in it) on top. How it looked after I was done:
Finally my last design (yes I said design not swatch) for the day. For this design I used Dutch 'Ya Just Love OPI? by OPI, it's a dark reddish purple with golden and red shimmer in it (I forgot to take pictures of the color but I'll post it once my exams are done). I stamped bundle monster's flower print from plate BM-221 with yellow Konad stamping polish on top. Swatches of the final result:
If you don't want to see a ruined manicure (or be grossed out) than I think you should stop here before clicking on read more. Hope you enjoyed my post for today. If you liked it or hated it let me know in the comment section below. If you want to continue click on read more :-).
My post for today is a continued post from yesterday. Sorry for not
posting it yesterday it's just I was really tired from studying all day. Also I tried uploading the pictures but they refused to be uploaded so I'm posting as a video instead :(. It finally allowed me to upload the images :D.
Tutorial for the manicure:
For the base color I used I Only Drink Champagne by OPI, it's a gold champagne frosty color with hint of shimmer in it. Side note: the picture is old so don't assume I applied I Only Drink Champagne on all my nails. Swatches of I only drink Champagne using flash:
Without flash (it was cloudy that day so the picture didn't turn out that great):
I bought the beads from Dollarama’s craft section ($1 for 6 bottles); you can
find these in most craft stores, dollar stores, ebay and etc for under $3
Up close image of the beads:
I used a separate container and added small amounts of all the color beads in it. Don’t forget to mix them after putting them in a small
container.
The one on the bottom are the beads I mixed, and on the top is one of the bottles of the eighteen bottles that I bought ebay for $3 (in other words for $3 you get 18 bottles).
Steps:
1. I applied “I Only Drink Champagne” by OPI on all my fingers
except for the ring finger and thumb. For stamping I used Konad plate m65 with
red Konad stamping polish.(I posted the swatches of I Only Drink Champagne on top). How it looked after the stamping:
2. Apply any black polish (I used Black Satin by Rimmel London) on your ring finger.
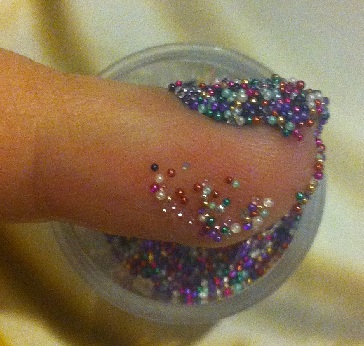
3. After you apply the polish dip your nail into the container;
in-order for the beads to stick to the nail make sure your nail polish is wet.
4. Using any paint brush, doting tool or your other finger
remove any access beads from top and under your nails. Side note: If you remove any beads that have nail polish on them don’t
put them back in the container.
5. Do the exact same for your thumb:
6. For this step you need tape for your tips. Before applying the tape make
sure your nails are dry and the tape isn't too sticky (simply apply the tape on
your skin and remove it 2-3 times in-order to lose the stickiness). Apply the tape horizontally on your tips. Apply black nail
polish on your tips and dip them in the container (like you did on your ring finger and thumb but this time your are only applying the nail polish and beads on the tips).
Swatches of the final design:
Hope you enjoyed my post for today. If you liked it or hated it let me know in the comment section below.
For today's manicure I did a simple half moon design.
For the base I used Miley by Zoya, it's a jelly-like sheer lilac
cream color. Since it's a jelly base you do need more than the usual 2-3 coats, but for this I only did 3 coats (considering the fact for a half moon you cover the bottom area of your nail). Swatch of Miley with flash:
Swatch of Miley without flash:
After your base color is fully dry apply French tip guides on upper part of your nail (end closer to your cuticle).
I applied Pamamplona Purple by OPI, a purple cream a bit on the darker side. Actually
I thought I had grabbed
Dim Sum Plum by OPI but after applying it I realized I had grabbed the wrong bottle :(. Anyways, once the polish is slightly dry remove the French
tip guide.
The final look after applying a top coat and cleaning
up the mess around me cuticle area:
Hope you liked the design. Between I learned to avoid auto-rotate on my images :D.